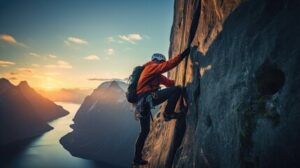
Identifying Pests is the First Step to Effective Pest Control

Pests like ants, rodents and insects can cause property damage and health problems like hantavirus and salmonella. When they get out of control, we may decide that action is needed.

Pest Control

Integrated Pest Management (IPM) strategies focus on preventing pests and their damage through a variety of methods such as monitoring, baits, physical traps and crack and crevice treatments. They use chemicals sparingly and with caution. For professional help, contact Pest Control Coquitlam BC.

Identifying pests accurately is the first step to successful pest control. The more closely you can match your pest to its description, the more specific your treatment options will be – and the safer your use of chemicals will be.

Using a pest identification guide can help you determine what species of pest you are dealing with. Begin by noting the pest characteristics such as shape, color, wings or antennae, size and whether it has a tail. Then compare those features to the pictures in the pest guides. When you find a match, click on the picture to see more information including its behavior, habitat and damage it causes.

When you know what type of pest you are dealing with, you can also get more information about its biology and habits to determine whether it is a true nuisance or a harmless natural predator. This helps you determine if it can be tolerated or if you need to take action. It also allows you to select the best control strategies.

For example, if you are dealing with beetles that bore holes in wood, you might choose to drill out the holes and treat them with labeled wood preservatives rather than applying pesticides. The same holds true for rodents such as mice and rats. Knowing what they eat, where they breed and how long they live will help you develop a non-chemical pest management plan that is appropriate to the species.

Similarly, for crop pests it is important to understand what their dietary needs are, the environmental conditions they prefer and any other biological cues that may be relevant in developing an IPM strategy. Knowing the life cycle of a pest and its reproductive system will also help you plan a cultural or physical control strategy that minimizes the need for chemical controls.

In addition to pest identification, monitoring should be conducted regularly. This will allow for early detection of a pest problem, as well as recording and reporting sightings to the food manufacturer and to the pest control company. It will also enable the pest management company to record and respond to any trends that occur.

Prevention

Pests can contaminate food, damage buildings and pose health risks to people. They also disturb natural cycles, alter habitats and compete with humans for food, water, shelter and space.

Prevention is an essential part of pest control. The goal is to keep pests from entering sites where they do not belong, or reduce their numbers to the point that they can be tolerated. Prevention can be achieved by using physical, biological or chemical methods.

Physical controls include traps, screens, fences, barriers and netting. Chemicals, including disinfectants and odorizers, can be used to deter pests and thereby reduce their nuisance value. However, some chemicals, such as those in aerosol sprays, are irritants and can cling to carpets, furniture and other surfaces where they cannot be removed. Consequently, their use must be limited to areas where they are not likely to come into contact with humans.

Biological control involves the use of microorganisms to suppress or kill pests. These organisms are often specific to a certain type of pest. For example, Bacillus thuringiensis (Bt) is a bacteria that produces toxins that destroy the midgut of caterpillars. Biological methods are generally less hazardous to people than chemical pesticides.

Preventing pests from entering your establishment requires an ongoing commitment from everyone in the facility. This includes owners, managers, supervisors and residents. It starts with keeping living spaces and work areas clean and reporting building maintenance problems to management. Clutter provides places for pests to breed and hide. It is important to remove stacks of papers, cardboard and other materials from floors, walls and shelves. It is also a good idea to regularly remove trash and use tight-fitting lids on garbage cans.

Proper cleaning and sanitation are also essential to prevent pests from breeding. This should include keeping all surfaces and equipment in good repair, removing rubbish regularly, and storing foodstuffs properly. It is also a good idea to store pesticides and other hazardous materials in locked cabinets or rooms when not in use. It is also a good idea to label all pesticides and to follow the instructions on their use.

Suppression

Pests can cause problems in food production environments because they are attracted to foodstuffs and other resources. They can also carry and spread pathogens (e.g., Hantavirus and Shigella bacteria) via droppings and urine and infest food with their bodies or external parts.

Many factors influence the growth of a pest population, including food supply, water supply, available shelter, and natural enemies. Changing any of these factors can reduce the number of pests. Some pests are erratic, and their populations grow and die with the cycles of weather or other environmental factors. Others are continuous, and their numbers need to be controlled on a regular basis.

The goal of pest management is to prevent pests from damaging or destroying products or facilities. A few pests here and there may not be a problem, but when they become too numerous or too destructive it is time to take action. The best approach is to follow the principles of integrated pest management, or IPM.

IPM begins with a thorough assessment of the environment in which pests occur. Then, a plan is devised to make changes that will prevent or limit their damage. In the past, this might have meant the use of chemicals, but today, many effective methods for controlling pests are non-chemical and can be achieved with minimal disruption to the environment.

Methods for preventing or controlling pests include physical, cultural, biological, and chemical controls. Physical controls include traps, screens, fences, and barriers that can block or keep pests from getting into an area. Cultural controls can alter the environment to reduce pest establishment, reproduction, and dispersal, for example by changing irrigation practices to reduce root diseases or introducing beneficial nematodes that will attack and kill insects and other pests.

Biological control uses natural enemies such as predators, parasites, and competitors to reduce the numbers of unwanted organisms. These organisms are usually microscopic, such as the nematode Steinernema carpocapsae that attacks and kills cockroaches, or they may be larger organisms such as birds or rodents. Chemical control includes the use of pesticides to kill or suppress pests, but this is a very limited option and can be very harmful to people and other creatures. It is important to minimize the use of pesticides whenever possible.

Eradication

Eradication is the goal of pest control and can be accomplished with a number of methods. These include physical traps, barriers, and sprays. Pest control professionals may also use biological methods like predators, parasites, and pathogens. These are usually specific to the pest being managed and can often be quite effective. For example, the bacterium Bacillus thuringiensis (Bt) is used to kill caterpillars and other Lepidopterans without harming people or pets. Many different Bt strains are available for management of different insects.

Ideally, you want to prevent pests from getting into your facility in the first place. To do this, you must keep pests from finding food sources and water, avoid attracting them by not leaving out food or other appealing items, and sanitize areas where they are known to be. This will help to keep them away from your staff, clients, or customers and protect your reputation.

If you do find evidence of pests in your establishment, you should report it to your management right away. They will work with a licensed pest control operator to safely remove the pests. Look for indications like mouse pellets, small droppings, or oily stains from flies, rodents, and cockroaches. You can also spot them by their odor, which is particularly strong in the case of cockroaches.

Chemical pesticides are a common way to eliminate pests, especially in agricultural settings. They are generally very effective, but they can be harmful to the environment and human beings if not used correctly. Ensure that you only use chemicals for pest control when necessary and have qualified staff handle them, as they can be very toxic.

Biological pest control relies on natural enemies such as parasites, pathogens and predators to eliminate the pest population. These are usually very specific to the pest species in question, and can be effective even on invasive pests. In addition to these, you can sometimes supplement the natural control with a chemical agent such as Boron or a known pesticide (which is regulated by EPA). For example, adding the boron compound into cellulose insulation at certain levels provides a mechanical kill factor for self-grooming pests like termites and ants.

The Comprehensive Guide to Home Generator Repair: Ensuring Reliability and Longevity

generator

Home generators have become a vital backup system in today’s world, where power outages are inconvenient and have serious consequences. They provide an essential service, ensuring your home remains powered during unexpected outages, keeping necessary appliances running, and maintaining comfort. However, like any other mechanical device, generators require regular maintenance and occasional repairs to operate reliably when needed.

This article will delve into the importance of Generac Generator maintenance, common issues, and a step-by-step guide on repairing and maintaining your home generator.

Understanding the Importance of Regular Generator Maintenance

Generators are complex machines, and their continuous functionality depends on regular upkeep. Neglecting maintenance can lead to several issues, including poor performance, reduced efficiency, and even complete failure during an outage. Regular maintenance not only prolongs the life of your generator but also ensures that it operates at peak performance when you need it the most.

Key Benefits of Regular Maintenance
  1. Reliability: Regular maintenance ensures that your generator starts without fail during an outage. This reliability is crucial, especially in areas prone to frequent power disruptions.
  2. Longevity: A well-maintained generator can last significantly longer than one that is neglected. Regular checks and servicing prevent minor issues from developing into major problems that could shorten the lifespan of your generator.
  3. Efficiency: Generators that are regularly serviced operate more efficiently, consuming less fuel and providing consistent power output.
  4. Safety: Generators can be dangerous if not properly maintained. Regular checks help identify potential safety hazards, such as fuel leaks or faulty wiring, before they become serious issues.

Common Generator Problems and How to Diagnose Them

Before diving into repairs, it’s important to understand the common issues that can affect home generators. These problems can often be diagnosed through regular inspections and understanding the symptoms.

  1. Failure to Start
    • Symptoms: The generator does not start, even when there is a power outage or when it is manually switched on.
    • Possible Causes: Dead battery, fuel supply issues, faulty starter motor, or blocked fuel lines.
    • Diagnosis: Check the battery voltage and connections, inspect the fuel supply, and ensure that the starter motor is functioning properly.
  2. Low Power Output
    • Symptoms: The generator runs, but the power output is insufficient to run all connected appliances.
    • Possible Causes: Clogged air filters, faulty voltage regulator, or worn-out spark plugs.
    • Diagnosis: Check and clean the air filter, inspect the voltage regulator for signs of wear, and examine the spark plugs for carbon buildup or damage.
  3. Overheating
    • Symptoms: The generator shuts down unexpectedly or runs hotter than normal.
    • Possible Causes: Low coolant levels, clogged cooling system, or malfunctioning thermostat.
    • Diagnosis: Inspect coolant levels, check the cooling system for blockages, and ensure that the thermostat is working correctly.
  4. Strange Noises or Vibrations
    • Symptoms: The generator produces unusual noises or vibrations during operation.
    • Possible Causes: Loose components, misaligned parts, or worn-out bearings.
    • Diagnosis: Inspect the generator for any loose bolts or screws, check for misaligned components, and examine bearings for wear and tear.
  5. Fuel Leaks
    • Symptoms: Visible fuel leakage or the smell of fuel around the generator.
    • Possible Causes: Damaged fuel lines, faulty fuel pump, or cracked fuel tank.
    • Diagnosis: Inspect the fuel lines for cracks or leaks, check the fuel pump for proper operation, and examine the fuel tank for any signs of damage.

Step-by-Step Guide to Home Generator Repair

Once you’ve diagnosed the problem, the next step is to carry out the necessary repairs. Here’s a comprehensive guide to help you through the process.

  1. Tools and Materials Needed
  • Multimeter
  • Screwdrivers (Phillips and flathead)
  • Wrenches
  • Spark plug wrench
  • Replacement parts (spark plugs, air filters, fuel lines, etc.)
  • Cleaning supplies (rags, degreaser, etc.)
  • Coolant and oil
  • Safety gear (gloves, safety glasses)
  1. Safety First
  • Shut Off the Generator: Before beginning any repair work, ensure the generator is turned off and disconnected from any power source.
  • Disconnect the Battery: This prevents accidental starts and reduces the risk of electrical shock.
  • Ventilation: Work in a well-ventilated area to avoid inhaling fumes or exhaust.
  1. Battery Maintenance and Replacement
  • Check the Battery Voltage: Use a multimeter to check the battery voltage. A fully charged battery should read around 12.6 volts.
  • Clean the Terminals: Corrosion on battery terminals can prevent the generator from starting. Clean the terminals with a wire brush and a solution of baking soda and water.
  • Replace the Battery: If the battery is dead or unable to hold a charge, replace it with a new one that matches the generator’s specifications.
  1. Fuel System Inspection and Repair
  • Check Fuel Levels: Ensure that there is enough fuel in the tank. If the fuel is old (more than 30 days), consider draining and replacing it with fresh fuel.
  • Inspect Fuel Lines: Look for cracks or leaks in the fuel lines. Replace any damaged lines immediately.
  • Clean the Fuel Filter: Over time, the fuel filter can become clogged with debris. Clean or replace the fuel filter to ensure proper fuel flow.
  • Test the Fuel Pump: If the generator still won’t start, the fuel pump may be faulty. Use a multimeter to test the pump’s functionality and replace it if necessary.
  1. Air Filter Maintenance
  • Remove and Inspect the Air Filter: A dirty or clogged air filter can restrict airflow and reduce engine performance. Remove the air filter and inspect it for dirt and debris.
  • Clean or Replace the Air Filter: If the filter is dirty, clean it with compressed air or replace it with a new one. Ensure the new filter is properly seated before reassembling.
  1. Spark Plug Replacement
  • Remove the Spark Plug: Use a spark plug wrench to remove the spark plug. Inspect it for signs of wear, such as carbon buildup or cracks.
  • Check the Gap: Ensure the spark plug gap matches the manufacturer’s specifications. Use a gap tool to adjust if necessary.
  • Install a New Spark Plug: If the old spark plug is worn or damaged, replace it with a new one. Tighten it securely and reconnect the spark plug wire.
  1. Cooling System Maintenance
  • Check Coolant Levels: Low coolant levels can cause the generator to overheat. Check the coolant reservoir and top it off if necessary.
  • Inspect the Radiator and Hoses: Look for any blockages in the radiator or damage to the hoses. Clean the radiator fins with compressed air and replace damaged hoses.
  • Test the Thermostat: A faulty thermostat can prevent the cooling system from functioning properly. Test the thermostat by placing it in boiling water and checking if it opens. Replace if necessary.
  1. Electrical System Inspection
  • Check Wiring and Connections: Inspect the generator’s wiring for any loose connections or damaged wires. Tighten any loose connections and replace damaged wires.
  • Test the Voltage Regulator: Use a multimeter to check the voltage output from the regulator. If the output is outside the manufacturer’s specifications, replace the regulator.
  • Examine the Circuit Breaker: If the generator trips its circuit breaker, inspect the breaker for signs of wear or damage. Replace the circuit breaker if it’s faulty.
  1. Lubrication and Oil Change
  • Check Oil Levels: Low oil levels can cause the generator to shut down. Check the oil level and add oil if necessary.
  • Change the Oil: Over time, engine oil breaks down and becomes less effective. Change the oil according to the manufacturer’s recommended intervals, using the correct type and grade of oil.
  • Lubricate Moving Parts: Apply a light lubricant to any moving parts, such as hinges and latches, to ensure smooth operation.
  1. Testing and Final Checks
  • Reconnect the Battery: Once all repairs are complete, reconnect the battery and secure it in place.
  • Start the Generator: Test the generator by starting it and letting it run for a few minutes. Check for any unusual noises, vibrations, or leaks.
  • Monitor Performance: Plug in a few appliances to test the generator’s power output. Ensure that it can handle the load without issues.

When to Call a Professional

While many generator repairs can be performed by homeowners, there are times when it’s best to call in a professional. If you encounter complex electrical issues, major engine problems, or if you’re unsure about any part of the repair process, it’s safer to seek professional assistance. A certified technician has the expertise and tools to diagnose and fix more advanced problems, ensuring your generator operates safely and efficiently.

Preventative Measures to Avoid Future Issues

In addition to regular maintenance, there are several preventative measures you can take to avoid future generator issues:

  1. Run the Generator Regularly: Regular operation helps keep the generator’s engine and components in good working order. Run the generator for about 30 minutes every month to prevent fuel from stagnating and to ensure it’s ready for use.
  2. Use Fuel Stabilizer: If your generator uses gasoline, consider adding a fuel stabilizer to the tank. This helps prevent the fuel from breaking down and clogging the fuel system.
  3. Store the Generator Properly: When not in use, store the generator in a cool, dry place. Protect it from dust and moisture, which can cause rust and other damage.
  4. Schedule Annual Professional Maintenance: Even if you handle regular maintenance yourself, it’s a good idea to have a professional technician inspect your generator annually. They can identify potential issues and perform more in-depth maintenance tasks.

A home generator is a critical investment that provides peace of mind during power outages. By understanding the importance of regular maintenance and knowing how to perform basic repairs, you can ensure that your generator remains reliable and efficient for years to come. However, always prioritize safety and don’t hesitate to seek professional help when needed. With proper care, your home generator will be ready to power your home whenever the need arises.